Step by step guide
Easy: Replace hose & swivel
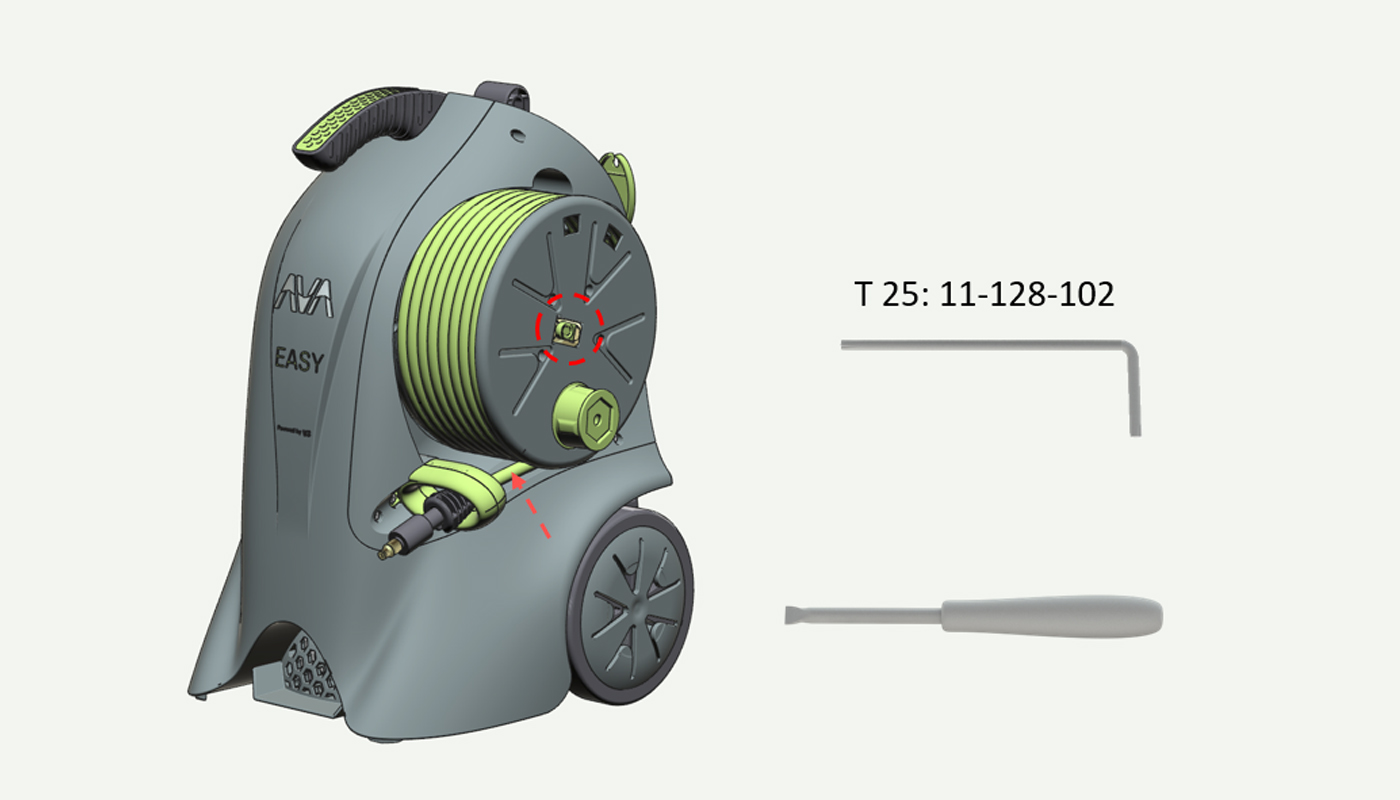
Learn how to easily replace the hose & swivel on your Easy pressure washer with this step-by-step guide. All you need are Torx 25 and one flathead screwdriver, or similar tools. Safety first! To prevent any accidents, ensure that your pressure washer is turned off and unplugged from its power source
1. Overview of components
a)Flex hose (12M) 95-100-893
b)E-clip (10mm) w. tab 95-100-883
c)Easy Quick connector spring 95-100-879 / Easy Quick connector cover 95-100-880
d)Square head quick connector 95-100-521
e)Easy Brass axle water outlet 95-100-875 / 1: O-ring (8*1.8mm, NBR 90) 95-100-425 / 2: O-ring (8.5*2mm NBR 90) 95-100-161

2. Unwind and disconnect hose
a)Pull the hose completely until all the hose is out of the reel, allowing you to see the swivel.
b)Push in the quick release button on the swivel and pull out the hose.
c)Unclick the hose form the two hose clips in the Reel.
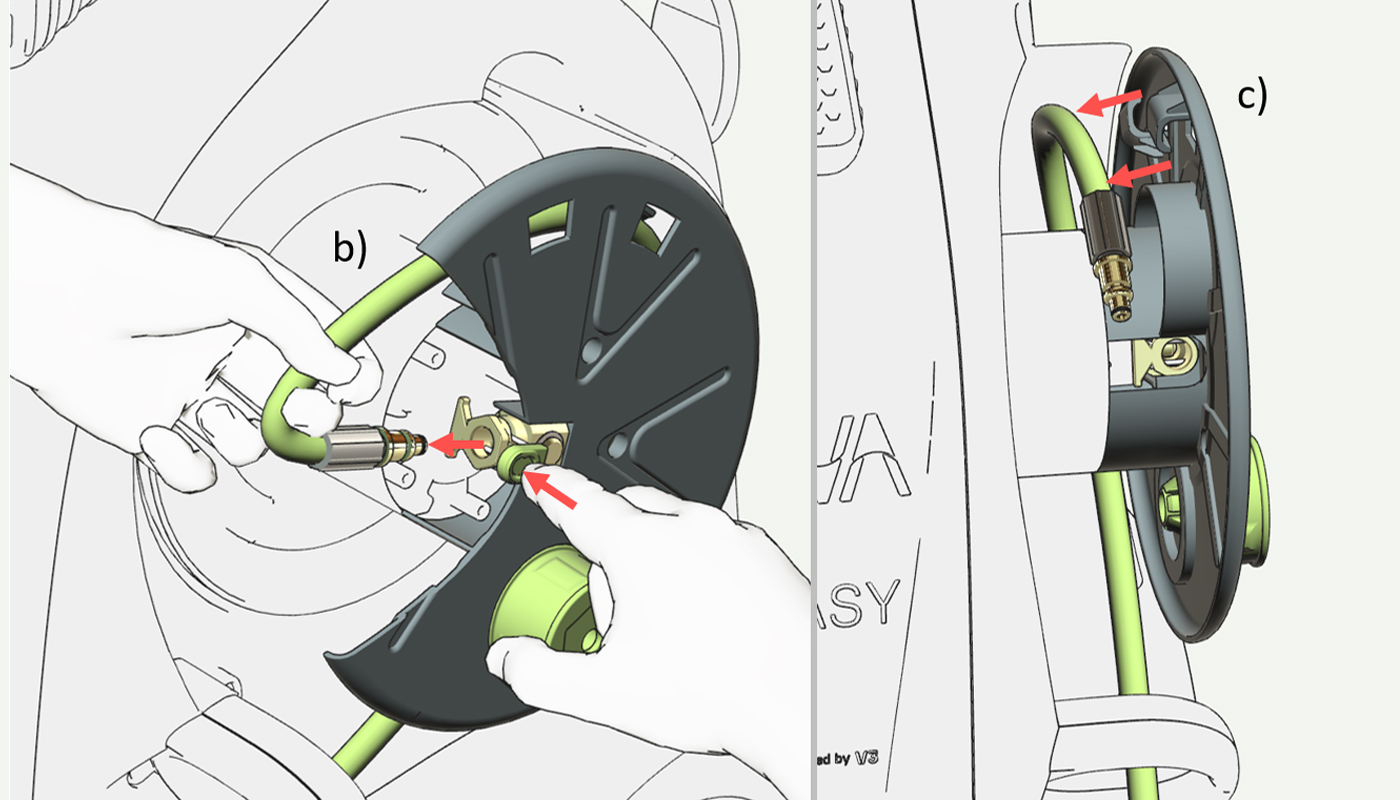
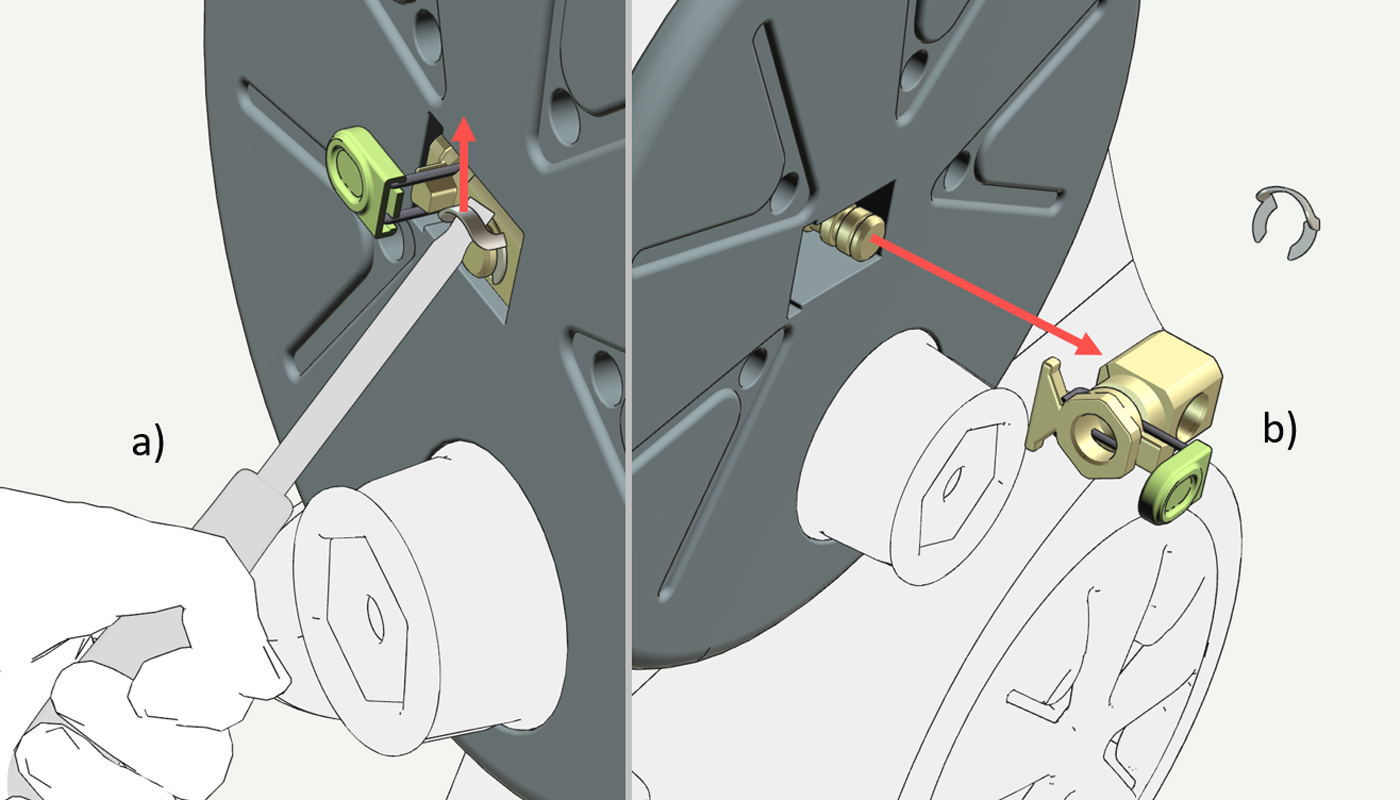
3. Disconnect the Square head quick connector
a)Remove the E-clip.
b)Pull out the Square head quick connector.
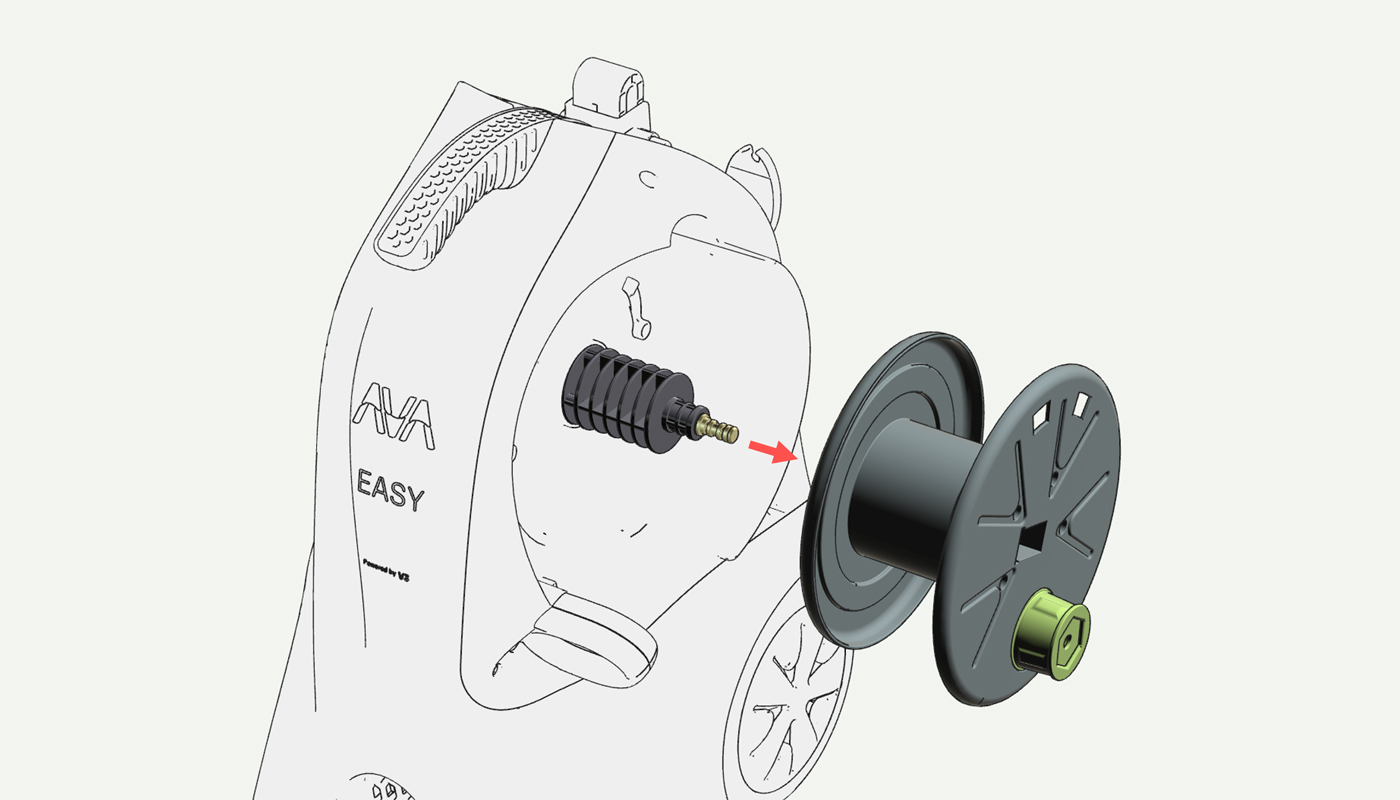
4. Pull out the Reel
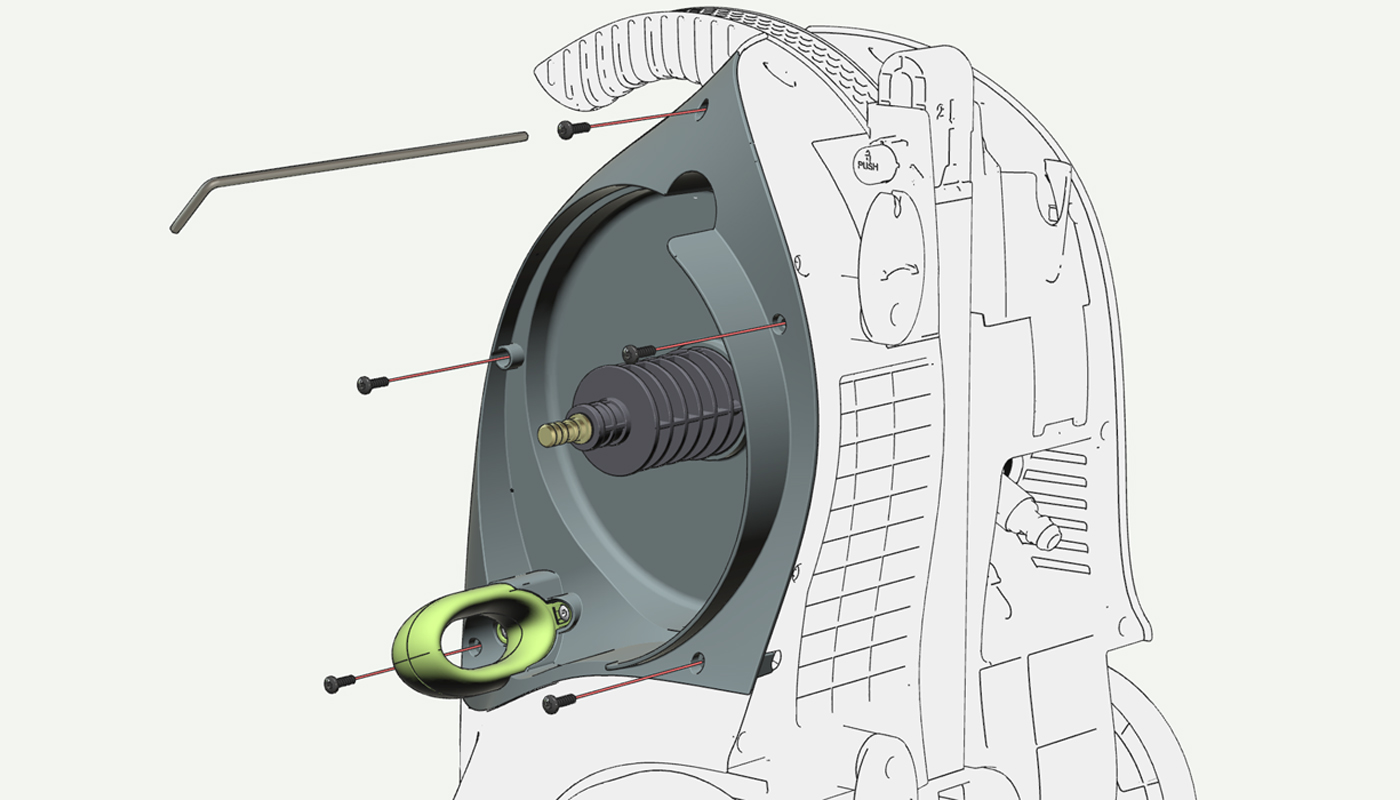
5. Release the pump module
Unscrew five screws (torx 25).
6. Remove the water filter
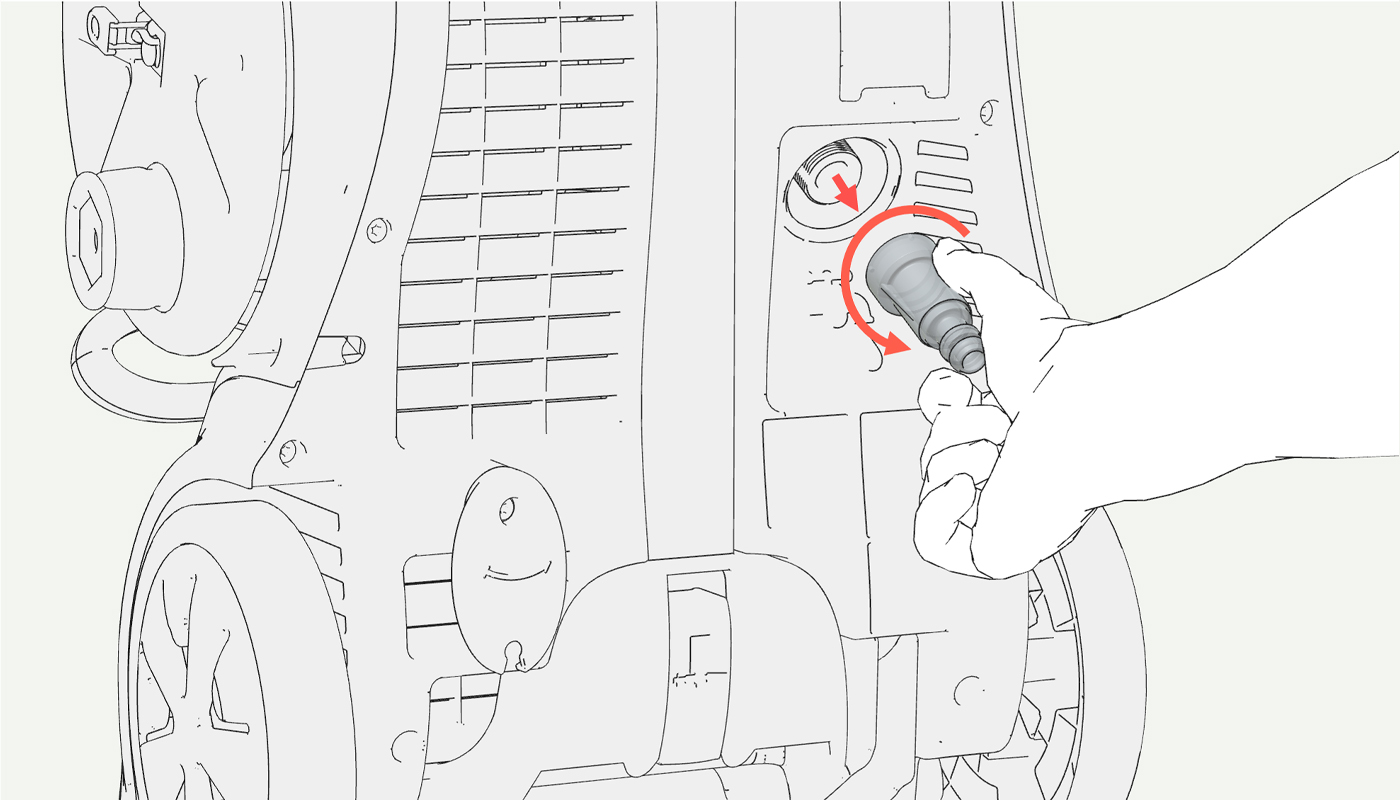
Unscrew the water filter (counterclockwise).
7. Pull out the Pump module
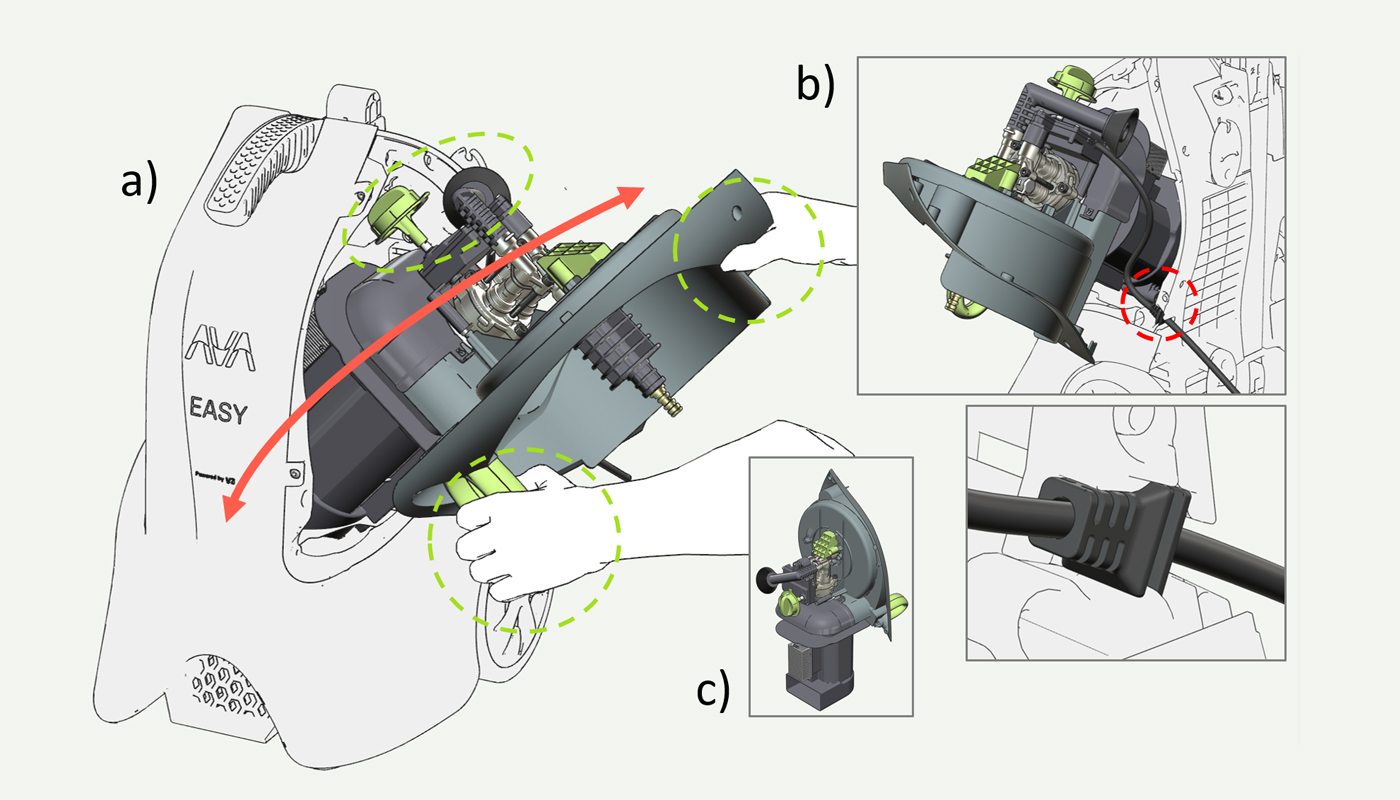
a)Place your hands on the green hose guide and inside the grove in top. Lift out the module. The module needs to be maneuvered up and down before it loosens. Do not use excessive force. Be aware the start switch and the inlet funnel at the top of the pump-system.
b)Pull out the the cable's bend restrictor. Remember to install this during the reassembly process.
c)Place the module on a flat surface.
8. Remove the Pump Head Bracket
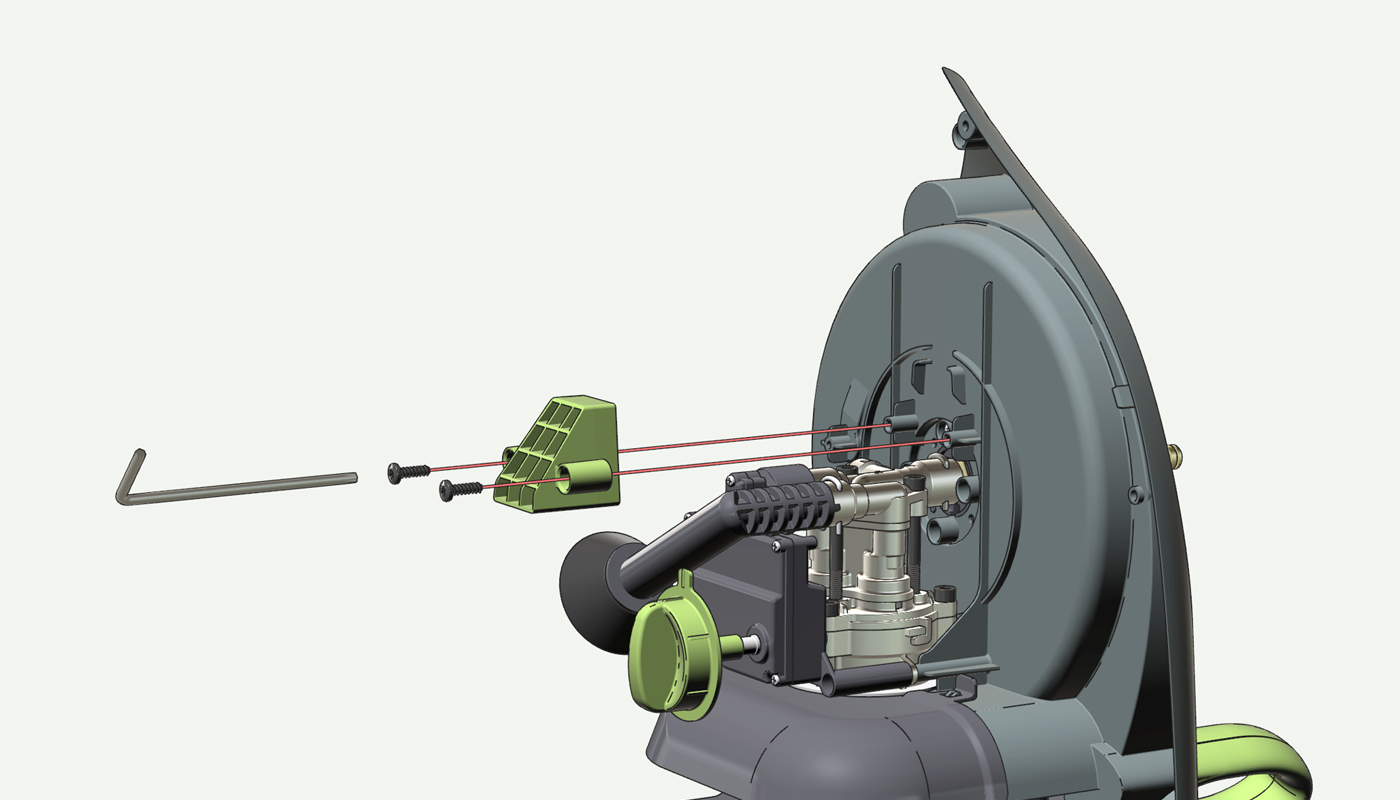
Unscrew two screws (torx 25).
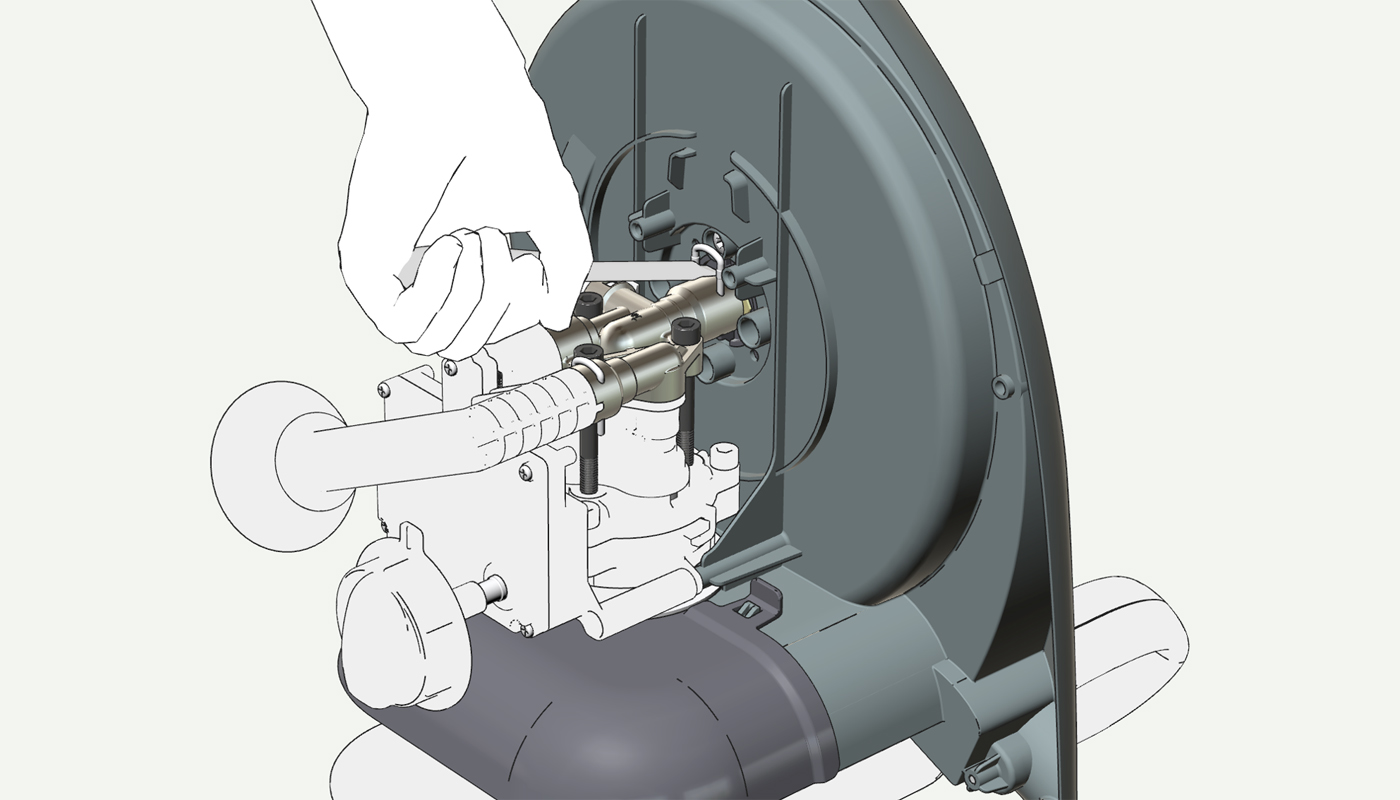
9. Remove U-pin
Use a flathead screwdriver to tilt out the U-pin.
10. Loosen the Reel Cabinet from the pump
a)Remove the start switch to access the screws.
b)Unscrew two screws (torx 25).

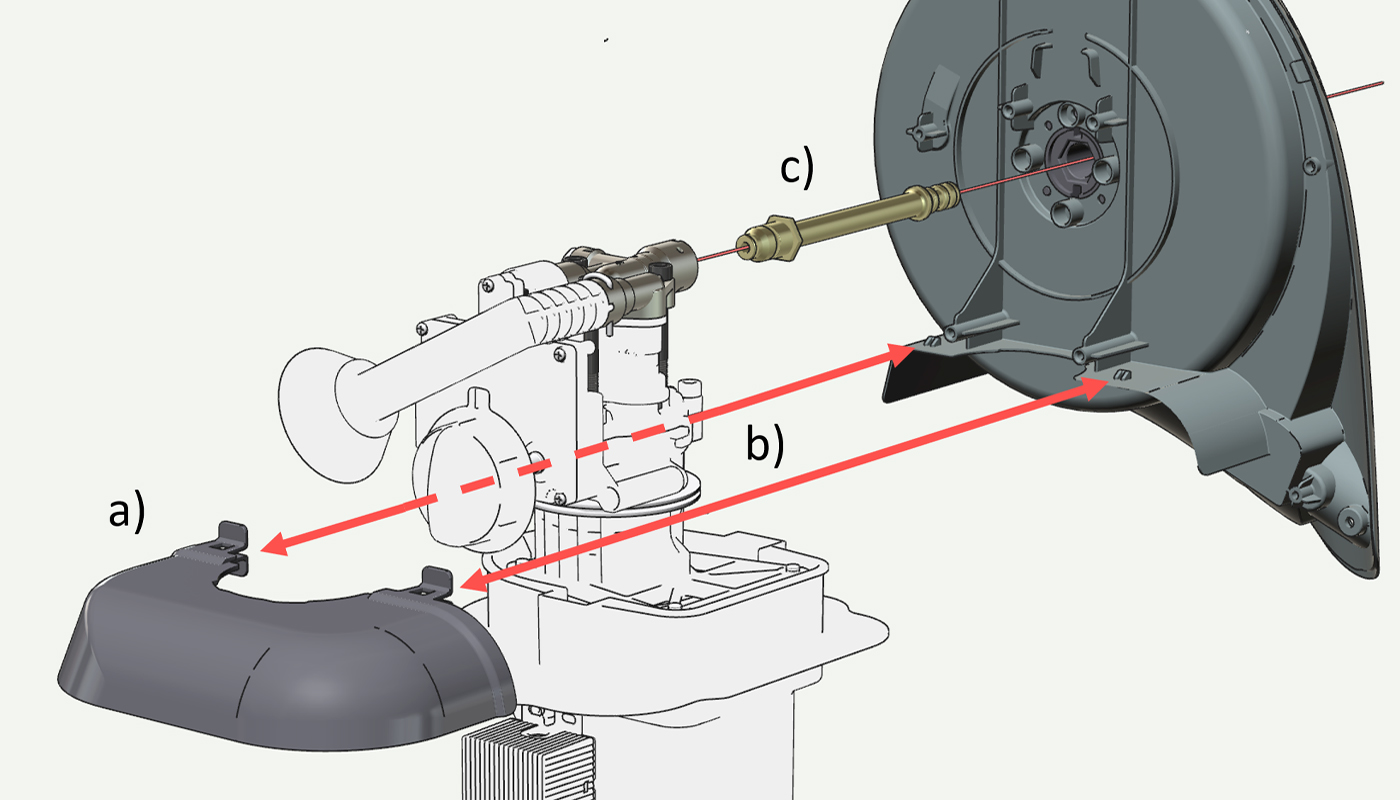
11. Disassemble the Outlet Pipe
a)Unclick two clips on the Motor waterproofing cover
b)Pull away the cover and the Reel Cabinet
c)Pull out the Outlet Pipe.
12. Assemble sequence
When you are now going to assemble the machine, you can perform all the steps above in reverse order. The assembly steps 1-13 are as follows:
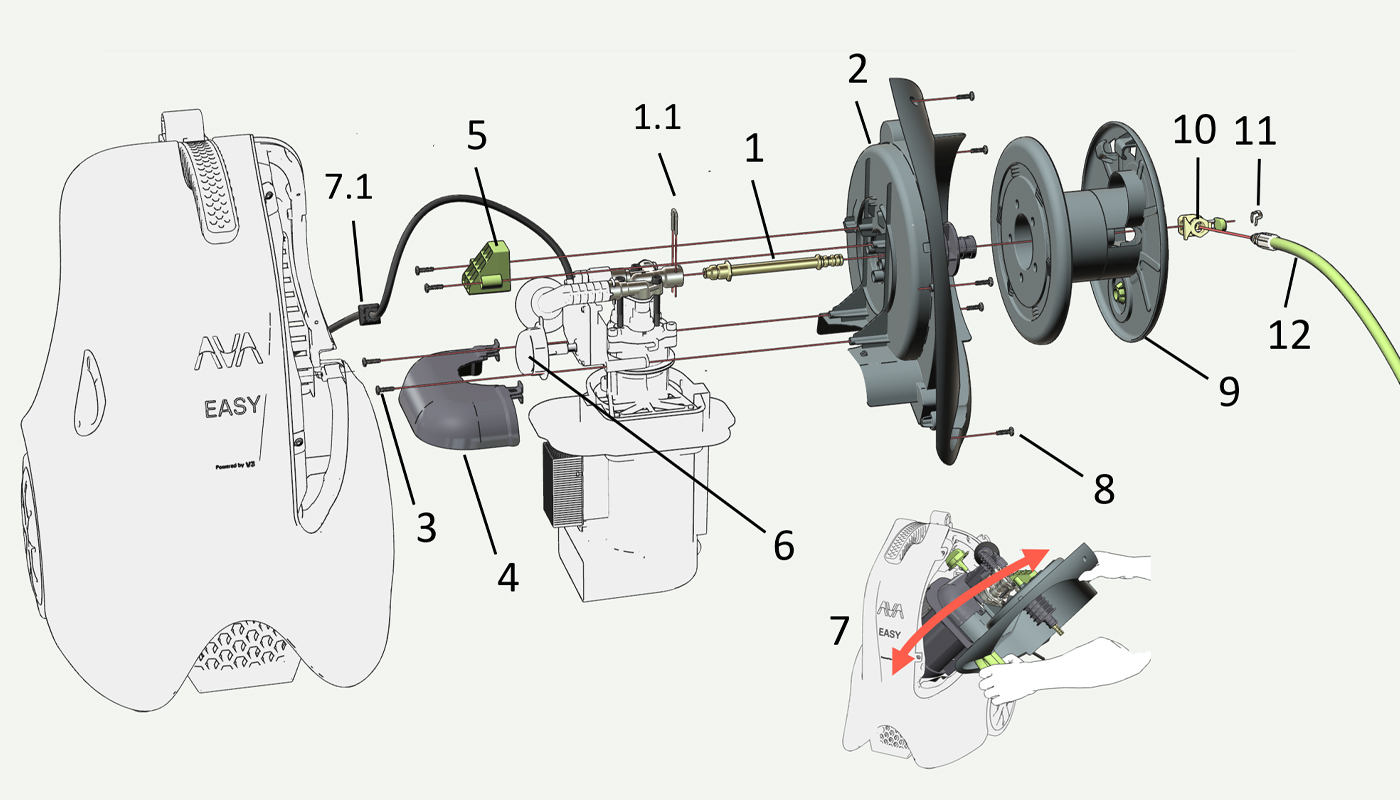
1.Put the outlet pipe into the pump head outlet. Check the O-rings for visual damage. Secure the pipe to the outlet by placing the U-pin (1.1) in the groove. Remember to push the U-pin all the way in.
2.Put the Reel Panel onto the outlet pipe. Clock the hexagon interface on the pipe with the hexagon groove in the panel. Check O-ring for visual damage.
3.Fasten the Reel Panel to the Pump with two screws (torx 25)
4.Click the Motor waterproofing cover onto the Reel Panel. Check that both clips is loced.
5.Fasten the pump head bracket onto the Reel Panel with two screws (torx 25).
6.Check that the start switch is placed at the pump module
7.Put the pump module into the machine cabinet. Translate to English: Halfway in, insert the cable's bend restrictor (7.1) into the corresponding slot in the cabinet. Gently press the pump module all the way in so that the start button protrudes on the other side of the cabinet. The module needs to be maneuvered up and down before it falls into place. Do not use excessive force.
8.Secure the pump module with five screws (torx 25).
9.Push the Reel onto the Outlet pipe, all the way into the Reel cabinet.
10.Push the Square head quick connector onto the Outlet end. Before you do so, lubricate the O-rings with acid-free Vaseline or equivalent.
11.Install the e-clip onto the Outlet pipe.
12.Install the hose into the quick connector. Connect the hose end without rubber sleeve Remember to thread the hose through the green hose guide. Also check the O-ring for visual damage.
13. Reinstall the water filter.